- Sold-out

Banner


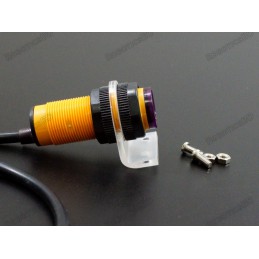
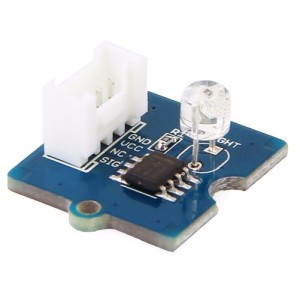
The IR Beam Interruption Sensor – LED 3mm (0–50 cm) is a compact and reliable solution for object detection and automation projects. It works by transmitting an infrared beam between the transmitter and receiver; any interruption triggers an output signal. With a narrow 10° beam angle, fast response time of up to 2 ms, and simple wiring compatibility with Arduino or other microcontrollers, this sensor ensures precise detection in applications such as measuring gates, counters, security systems, and DIY robotics. Its 3.3V–5V operating voltage range and open-collector output make it versatile and easy to integrate into various projects. Featured By RoboticsBD.
Product Images are shown for illustrative purposes only and may differ from the actual product.
RoboticsBD RoboticsBD RoboticsBD RoboticsBD RoboticsBD RoboticsBD RoboticsBD RoboticsBD RoboticsBD RoboticsBD
Detects objects by interrupting an IR beam between transmitter & receiver.
Adjustable range up to 50 cm for flexible use in different environments.
Narrow 10° beam angle for accurate alignment and minimal false triggers.
Fast 2 ms response time, ideal for high-speed detection applications.
Arduino & microcontroller compatible, simple 3-wire connection.
Low power consumption: 9mA @ 3.3V, 20mA @ 5V.
Open-collector output with built-in or external pull-up support.
Compact size and lightweight design for easy integration.
RoboticsBD RoboticsBD RoboticsBD RoboticsBD RoboticsBD RoboticsBD RoboticsBD RoboticsBD RoboticsBD RoboticsBD
Counting objects on conveyor belts or assembly lines.
Measuring gates for robotics and competition projects.
Security alarms and automatic entry detection systems.
DIY robotics for obstacle detection and automation control.
Industrial automation where precise object detection is required.
RoboticsBD RoboticsBD RoboticsBD RoboticsBD RoboticsBD RoboticsBD RoboticsBD RoboticsBD RoboticsBD RoboticsBD
| General Specifications | |
| Product Type | IR Beam Interruption Sensor |
| Supply Voltage | 3.3V – 5V |
| Current Consumption | 9mA (3.3V), 20mA (5V) |
| Detection Range | 0 – 50 cm |
| Diode Type | 3mm IR LED |
| Illumination Angle | 10° |
| Response Time | Up to 2 ms |
| Output Type | Open Collector |
| Output Requirement | Pull-up resistor (internal/external) |
| Interface Compatibility | Arduino, Microcontrollers |
| Color Wires | Black (GND), Red (VCC), White/Yellow (Signal) |
| Shipment Weight | 0.0074 kg |
| Shipment Dimensions | 8 × 6 × 2 cm |
Please allow 5% measuring deviation due to manual measurement.
RoboticsBD RoboticsBD RoboticsBD RoboticsBD RoboticsBD RoboticsBD RoboticsBD RoboticsBD RoboticsBD RoboticsBD
Wiring these sensors for Arduino use is really easy.
First up you'll need to power the transmitter. Connect the black wire to ground and the red wire directly to 3.3V or 5V power. It will draw 9mA from 3.3V (lower power) and 20mA from 5V (better range)
Next up you'll want to connect up the receiver. Connect the black wire to ground, the red wire to 3.3V or 5V (whichever logic level you like) and then the white or yellow wire to your digital input.
Note that you do not have to share power supply ground or power between the two, the 'signal' is sent optically.
The receiver is open collector which means that you do need a pull up resistor. Most microcontrollers have the ability to turn on a built in pull up resistor. If you do not, connect a 10K resistor between the white wire of the receiver and the red wire.
On an Arduino, we'll connect the signal (yellow/white) pin to Digital #4

Run this demo code on your Arduino
/*
  IR Breakbeam sensor demo!
*/

#define LEDPIN 13
  // Pin 13: Arduino has an LED connected on pin 13
  // Pin 11: Teensy 2.0 has the LED on pin 11
  // Pin  6: Teensy++ 2.0 has the LED on pin 6
  // Pin 13: Teensy 3.0 has the LED on pin 13

#define SENSORPIN 4

// variables will change:
int sensorState = 0, lastState=0;         // variable for reading the pushbutton status

void setup() {
  // initialize the LED pin as an output:
  pinMode(LEDPIN, OUTPUT);
  // initialize the sensor pin as an input:
  pinMode(SENSORPIN, INPUT);
  digitalWrite(SENSORPIN, HIGH); // turn on the pullup

  Serial.begin(9600);
}

void loop(){
  // read the state of the pushbutton value:
  sensorState = digitalRead(SENSORPIN);

  // check if the sensor beam is broken
  // if it is, the sensorState is LOW:
  if (sensorState == LOW) {
    // turn LED on:
    digitalWrite(LEDPIN, HIGH);
  }
  else {
    // turn LED off:
    digitalWrite(LEDPIN, LOW);
  }

  if (sensorState && !lastState) {
    Serial.println("Unbroken");
  }
  if (!sensorState && lastState) {
    Serial.println("Broken");
  }
  lastState = sensorState;
}
With the above wiring, when you put you hand between the sensor pair, the onboard LED will turn on and the serial console will print out messages:

1 x IR Beam Interruption Sensor - LED 3mm - 0-50 cm
RoboticsBD RoboticsBD RoboticsBD RoboticsBD RoboticsBD RoboticsBD RoboticsBD RoboticsBD RoboticsBD RoboticsBD
RoboticsBD RoboticsBD RoboticsBD RoboticsBD RoboticsBD RoboticsBD RoboticsBD RoboticsBD RoboticsBD RoboticsBD
Specific References
Your review appreciation cannot be sent
Report comment
Report sent
Your report cannot be sent
Write your review
Review sent
Your review cannot be sent
Reference: RBD-2723
Reference: RBD-2980
Reference: RBD-2381
Brand: Hi-Link
Reference: RBD-3644
Reference: RBD-2227
Brand: Hi-Link
Reference: RBD-1177
Reference: RBD-3792
Brand: Hi-Link
Reference: RBD-3171
Reference: RBD-2395
Brand: Hi-Link
Reference: RBD-2892
Reference: RBD-2298
Reference: RBD-1211
Reference: RBD-1648
Reference: RBD-2950
Reference: RBD-2221
Reference: RBD-3091
Brand: DFRobot
Reference: RBD-0768
Reference: RBD-0376
Reference: RBD-1349
Reference: RBD-1354
Reference: RBD-1738
Reference: RBD-2639
Reference: RBD-3099
Reference: RBD-0022
Reference: RBD-3222
Brand: Hi-Link
Reference: RBD-0685
Reference: RBD-0430
check_circle
check_circle