Description
Teensy 4.1 is the most powerful Arduino compatible microcontroller available today. Based on the NXP i.MX RT1062 ARM Cortex-M7 running at 600MHz with the ability to be overclocked. It is formatted into a very compact ‘teensy’ board outline for easy embedding into projects or for use with solderless breadboards. Perhaps best of all, it is compatible with the popular Arduino IDE programming environment as well as many of the existing Arduino libraries, so it is very easy to get up and running unlike many other advanced microcontrollers that are available.
Besides the standard Teensy 4.1 available with and without standard pins, we are now carrying two other variations of the basic product:
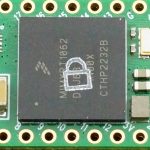
Teensy 4.1 NE – Teensy 4.1 with No Ethernet (NE)
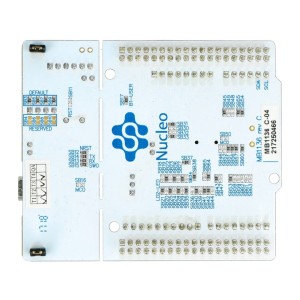
The Teensy 4.1 NE modules are exactly the same as the standard Teensy 4.1 except the NE version is missing the Ethernet PHY chip as shown here. This chip provides the interface between the Ethernet controller built into the NXP microprocessor and the physical Ethernet cable.
Some Teensy 4.1 are now being built without this chip due to on-going PHY chip shortages plus a price increase on the part. If you don’t plan to use wired Ethernet, the NE version is a good option to consider since it is a little less expensive than the standard version and otherwise identical.
All of our Fully Loaded Teensy 4.1 products have this chip and have Ethernet capability.
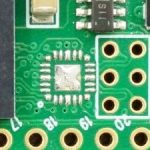
Teensy 4.1 Lockable – Teensy 4.1 that can be locked into a secure mode.
The lockable Teensy 4.1 is a special version which can be permanently locked into a secure mode. Secure mode implements encryption of the software and prevents unauthorized copying or cloning of the software. This version is identified with a lock symbol stamped on the CPU. Our lockable Teensy 4.1 all have Ethernet capability.
 The lockable version will operate like a standard Teensy 4.1 if it is not locked, but it removes some of the safeguards that are built into the standard Teensy 4.1 to prevent permanently bricking the module with bad software. For this reason, it is recommended only when code security is a requirement, usually for commercial applications.
Our Teensy 4.1 Fully Loaded products with additional memory or Teensy 4.1 Audio Stacks can also be built with this lockable version of Teensy 4.1 upon request.
Refer to the PJRC page on Code Security and Lockable Teensy for more information on using this feature: https://www.pjrc.com/teensy/td_code_security.html
Teensy 4.1 Fully Loaded Products
If you are looking for Teensy 4.1 with the Ethernet header preinstalled and optionally PSRAM or Flash chips preinstalled and tested, head over to this page: Teensy 4.1 Fully Loaded
If you are looking for Teensy 4.1 built for use with a custom PCB like our Prototyping System for Teensy 4.1, header over to this page: Teensy4.1 Fully Loaded for Prototyping System
These Fully Loaded versions are also available for ordering near the bottom of this page.
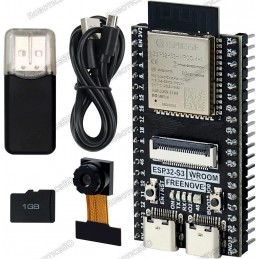
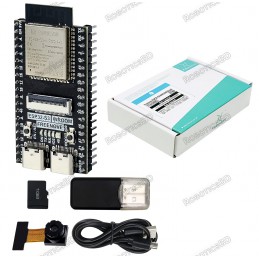
Package Includes:
- Teensy 4.1 (either with or without Ethernet or lockable based on selection)
- Qty 2 – 1×24 male headers selectively plated with gold contacts and tin solder pins (Optionally soldered on based on selection)
- Handy pinout diagram
KEY FEATURES OF TEENSY 4.1:
- i.MX RT1062 ARM Cortex-M7 running at 600MHz. Can be overclocked
- 1MB (1024K) RAM (512K tightly coupled)
- 8MB FLASH (64K reserved for recovery & EEPROM emulation)
- 2 QSPI chip locations to add up to 16MB PSRAM or 8MB PSRAM and 16MB FLASH
- 10/100 Mbit DP83825 PHY Ethernet header (Non-NE version only)
- USB host pins
- Micro SD Socket
- 2 USB ports, both 480 Mbit/sec, can be any device type
- 3 CAN Bus (1 with CAN FD)
- 2 I2S Digital Audio
- 1 S/PDIF Digital Audio
- 1 SDIO (4-bit) native SD
- 3 SPI, all with 16 word FIFO
- 3 I2C, all with 4 byte FIFO
- 8 serial ports, all with 4 byte FIFO
- 32 general purpose DMA channels
- 35 PWM capable pins
- 55 digital I/O, all interrupt capable
- 42 breadboard friendly I/O pins
- 18 analog input pins with 2 12-bit ADCs on-chip
- Cryptographic Acceleration
- Random Number Generator
- Built-in RTC for date/time
- Dynamic clock scaling
- True 64-bit floating point via FPU hardware
- Programmable FlexIO
- Pixel Processing Pipeline
- Peripheral cross-triggering
- Power On/Off management
- Compatible with Arduino IDE and many libraries
- Works with Windows, Mac OS X and Linux
- Small size is perfect for embedding or use with solderless breadboards
- 3.3V operation and I/O compatibility
The Teensy product line which is focused on being fast , small and Arduino compatible is developed by the company PJRC. They have a loyal following of designers and advanced hobbyists that create many libraries to take advantage of some of the more advanced features of the Teensy products or to modify Arduino libraries for compatibility. Many of them also participate in the excellent PJRC forum. The forum is targeted towards more advanced users and topics.
Just how fast is it? The chart below shows the Teensy 4.x series compared to some other popular boards using the CoreMark Benchmark test. Larger numbers = faster performance.
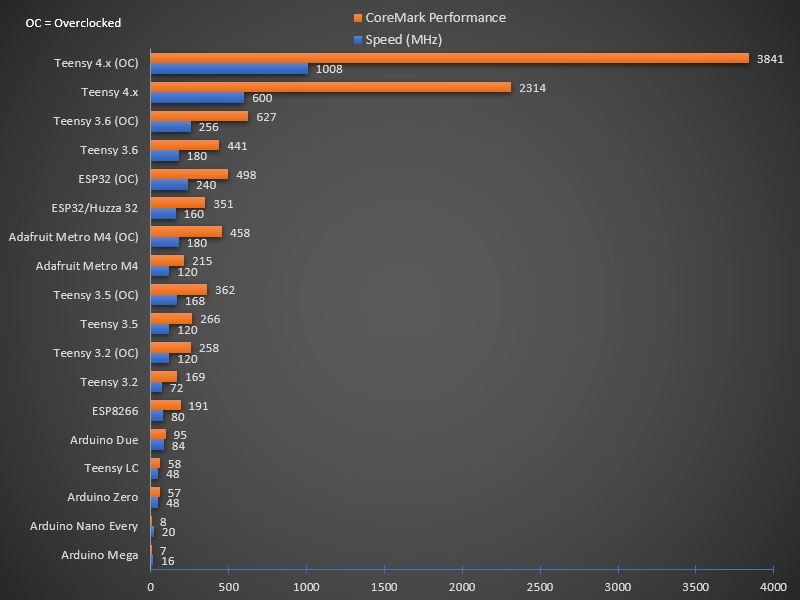
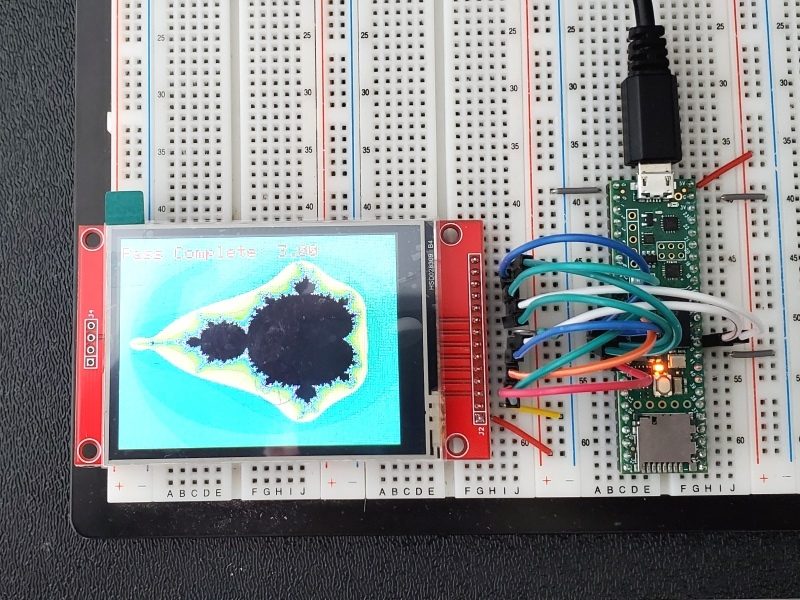
As another example, the classic Mandelbrot set was calculated and displayed using a Mega 2560 which took between 77 and 105 seconds per image. Calculating the image is very mathematically intensive. The Mega 2560 was then swapped out for the Teensy 4.1 and it took 1.24 to 1.26 seconds for the same task running the same software on both.

The heart of the i.MX RT1060 microcontroller is an ARM Cortex-M7 CPU core that brings many powerful features to a true real-time microcontroller platform.
The Cortex-M7 is a dual-issue superscaler processor, meaning the M7 can execute two instructions per clock cycle, at 600MHz! Of course, executing two simultaneously depends upon the compiler ordering instructions and registers. Initial benchmarks have shown C++ code compiled by Arduino IDE tends to achieve two instructions per cycle about 40% to 50% of the time while performing numerically intensive work using integers and pointers.
The Cortex-M7 is the first ARM microcontroller to use branch prediction. On the M4 as used on the Teensy 3.2, loops and other code which must branch take three clock cycles. With M7, after a loop has executed a few times, the branch prediction removes that overhead, allowing the branch instruction to run in only a single clock cycle.
Tightly Coupled Memory is a special feature which allows Cortex-M7 fast single cycle access to memory using a pair of 64 bit wide buses.
- The ITCM bus provides a 64 bit path to fetch instructions.
- The DTCM bus is actually a pair of 32 bit paths, allowing M7 to perform up to two separate memory accesses in the same cycle.
These extremely high speed buses are separate from M7’s main AXI bus, which accesses other memory and peripherals. 512K of memory can be accessed as tightly coupled memory.
Teensyduino automatically allocates your Arduino sketch code into ITCM and all non-malloc memory use is allocated to the fast DTCM, unless you add extra keywords to override the optimized default.
Memory not accessed on the tightly coupled buses is optimized for DMA access by peripherals. Because the bulk of M7’s memory access is done on the two tightly coupled buses, powerful DMA-based peripherals have excellent access to the non-TCM memory for highly efficient I/O.
Teensy 4.1’s Cortex-M7 processor includes a floating point unit (FPU) which supports both 64 bit “double” and 32 bit “float”. With M4’s FPU on Teensy 3.5 & 3.6, and also Atmel SAMD51 chips, only 32 bit float is hardware accelerated. Any use of double, double functions like log(), sin(), cos() means slow software implemented math. Teensy 4.1 executes all of these with FPU hardware.
If you need/want all the horsepower but don’t necessarily need all the I/O and peripherals found on the Teensy 4.1, the Teensy 4.0 uses the same microcontroller in a smaller physical footprint that is also a little less expensive.
Getting Started with Teensy
Install Arduino IDE Software
To program the Teensy using the Arduino IDE, you must first have the IDE installed if it is not already. If it is installed but not the current version, now is a good time to update to the latest.
Be sure to use the downloaded version of the Arduino IDE which can be downloaded at: https://www.arduino.cc/en/main/software
Install Teensyduino Software
 Teensyduino is the name of the PJRC software that adds features and libraries that support the Teensy boards on the Arduino IDE. Support is available for Windows, Mac OS X and Linux.
The download and installation instructions can be found at: https://www.pjrc.com/teensy/td_download.html
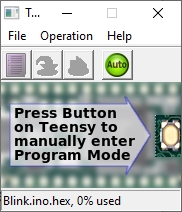
When Teensyduino is running which it should do automatically, a small window is opened on the desktop. This is the Teensy Loader application that handles the actual download to the Teensy board. Most of the time you can ignore this window as it defaults to Auto Mode which means it will take care of automatically downloading to the Teensy without needing to press the Teensy Program button, but it does need to be running in order to download to the Teensy boards.
Running Blink Program
Once you have the software installed, running the venerable ‘Blink’ program that blinks the on-board LED every second is no harder than a typical Arduino.
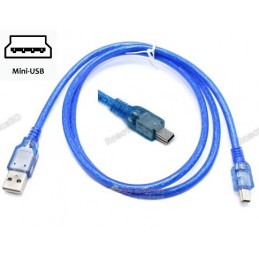
- Attach a Micro-B USB cable to the Teensy
- In the IDE select Tools / Board / Teensyduino / Teensy 4.1
- USB Type should be set to ‘Serial‘
- Select the COM port the Teensy 4.1 is on.
- Open Examples / Basics / Blink
- Press the upload button
The Teensy 4.1 has the on-board LED attached to pin 13 like a typical Arduino.
If the setup is correct, the software will compile and download to the Teensy. The onboard LED should start blinking once per second. Since the board will already have Blink installed when you receive it, you might want to change the timing of the blink to verify the new download was successful.
Important information before going further with using Teensy 4.1
I/O is 3.3V Tolerant Only!
The Teensy 4.1 operates at 3.3V internally and expects I/O to not exceed 3.3V. It is not 5V tolerant on any of its pins except for the VIN and VSUB pins which can be used to supply 5V power to the module.
If you use any 5V peripherals that drive signals back to the Teensy 4.1, be sure to utilize logic level shifters to avoid possible damage.
If you need a Teensy in a similar package that is 5V tolerant, the Teensy 3.5 may be a good choice to consider.
Power – One Power Source at a Time!
The Teensy 4.1 can be powered one of 3 different ways, but it is important to note that these are mutually exclusive unlike typical Arduino boards. Internally the module does not provide any power switching between the different power inputs. In essence, if you hook up two different power inputs such as through the USB cable and also through the VIN pin, those two power sources will be shorted together.
USB power (VUSB) – This is typically 5V supplied through the USB cable. A solder pad next to the USB connector also connects to the same VUSB power. An on-board regulator provides 3.3V to power the module
The Teensy 4.1 can also act as a USB Host and supply 5V power coming in on the VIN power input or VUSB pin and put it out the USB host port.
VIN pin – External power of 3.6V to 5.5V can be applied to the VIN pin which also powers the on-board 3.3V regulator to power the rest of the module.
3.3V pin (x2) – These are normally used as outputs to power 3.3V peripherals. Total current should be limited to less than 250mA to avoid overheating. Also if you draw too much power and cause the 3.3V to dip down around 3.0V, the CPU will reboot.
External power of 3.3V can also be applied to the 3.3V pins to power the Teensy in some cases, but this bypasses the on-board regulator which properly handles the power up sequence. This option is not recommended without doing some research. Specifically, VBAT needs a 3V power source such as a coin cell before applying power to the 3.3V pins.
 Avoiding Power Problems
The most likely way to run into trouble with power is by having the Teensy normally powered through VIN and then deciding to hookup the USB cable to download new code without disconnecting VIN first.
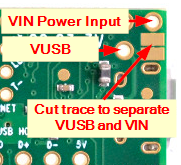
If it is desired to separate the VSUB and VIN power inputs, there is a trace between two large solder pads that can be cut as shown here. If the module is normally powered through VIN, this prevents the USB power from also connecting to the board.
A USB cable can also be modified by cutting the red 5V power wire inside cable to make it a data only cable.
Misc Bits of Info
USB Port
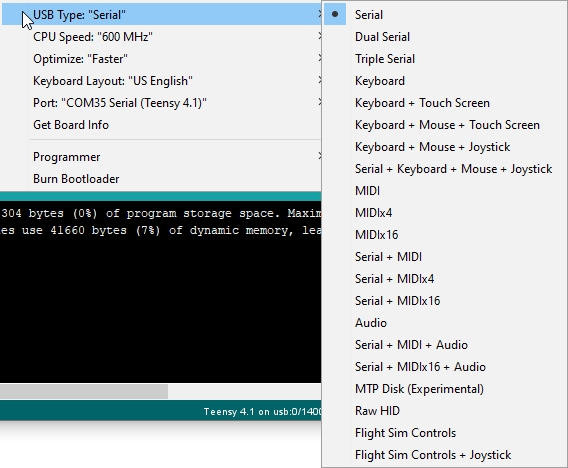
The USB port on the Teensy 4.1 has significant functionality not available on a normal Arduino. For most standard applications it should be set to the default “Serial” mode which is how it works with an Arduino. If you have problems connecting to the Teensy, check this setting.
A quick scan of the menu options available gives an indication of the flexibility of the USB port on Teensy 4.1.
The connector used is the standard Micro-B USB. As with any boards that use this small connector, use care to push/pull the cable directly in and out of the connector and not apply pressure upwards in a lever motion to avoid possible damage.
Program Button
The button on a Teensy board is not a typical reset button like on an Arduino. When pressed, the program button causes the Teensy to enter ‘Programming Mode” where it waits for a download over USB. If the Teensy is connected to the IDE via a USB cable, the last program will automatically be downloaded again and ran.
If the program button is pressed and held for about 15 seconds, the red LED will flash. When the button is then released, the FLASH memory is fully erased and a known good LED blink program is restored into FLASH memory and starts to run. This is a handy way to help restore an otherwise bricked module due to an errant program.
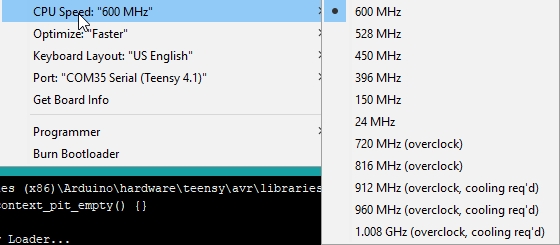
CPU Speed Selection
You didn’t select the Teensy 4.1 because it has a slow CPU, so naturally you are going to notice the CPU speed selection available in the IDE while poking around.
The default speed is 600MHz. You can select a lower speed to operate at, such as 24MHz, mainly for power sensitive applications. On the other hand you can also overclock the CPU potentially all the way up to 1.008GHz if adequate heat sinking is provided. Keep in mind that the parts on the board are graded for 600MHz, so performance at clock speeds above that cannot be guaranteed.
One nice feature is the the CPU has dynamic clock scaling that automatically adjusts timing parameters based on the clock speed that it is running. Recommended that you get up and running at nominal 600MHz before messing with this control.
The Teensy CoreMark benchmark page has some excellent information on performance, current and temperature over different operating frequencies.
Adding Additional Memory
There are two 8-pin SMD footprints on the bottom of the module under the SD card slot. The user can add chips to these locations to enhance the functionality or they can buy our preassembled and tested Teensy 4.1 Fully Loaded products near the bottom of the page.
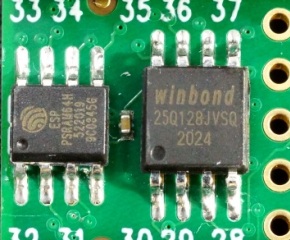
PSRAM
The smaller footprint supports an 8MB PSRAM chip. In addition, PSRAM can also be installed on the 2nd larger footprint providing a total of 16MB (128M-bit) additional memory. If only one PSRAM is being installed, it must be positioned on the smaller pads. PSRAM is handy for adding additional volatile data storage.
Use the extRAM_t4 library to work with PSRAM.
Use this Teensy41_psram_memtest to test the memory chip is properly mounted.
The approved compatible PSRAM chips which are interchangeable include:
- IPUS IPS6404LSQ
- ESP PSRAM64H
- AP 6404L-3SQR
- Lyontek LY68L6400S